Basic Makeup Hacks and how to Get Started – A Guestpost + Giveaway! 

Hey Ladies!I am so glad to write this post for Shilpa, our friendship goes back long in time, about 5 years back when we used to be colleagues. I still remember her suggestions to me for wearing formal clothes to a client in Delhi, haha! I knew there was something in this girl even then 😉 Shilpa has given me a great opportunity to write a post on makeup after seeing my collection! I want to thank her first for noticing my interest and giving me a stage to share my thoughts. Okay, now right into the post!

I never really thought too much about makeup until I decided to do my own makeup for my engagement and wedding. I was inspired by one of my close friends who did this and I was closely helping her. It was so much fun and you don’t need to be worried thinking what some random person will do to your face on your wedding day! That thought used to scare me a lot, so I stepped into the makeup world myself to explore and decide the way I want to look myself!  (I make it sound like some big venture, LOL)

I am not going to be talking about bridal makeup of course; it is a wideeee topic and involves many products! However, as I learnt that, I discovered how to use few products to make yourself look bright – where people can’t say whether you have or do not have make up, just that natural look, highlighting your best features! I thought it would be best to share those tips here 😊
I will try to keep the number of products as minimum as possible, but please pardon me if I go overboard in a few places 😀 I am going to split it into face, eyes and lips as usual.

Face

  • For a natural look, I usually don’t prefer to use any liquid foundation. For me it is just about touching up the face with a powder based foundation with light/ medium coverage. Try a Compaq powder if you want very light coverage.
  • The product I recommend here is the MAC studio fix foundation powder; you can build this foundation powder to give more coverage as well. I know this is going to be pretty expensive, but I would spend the money on a good foundation since it is the base for your make up. If however,  you want to go for a cheaper product I suggest the L’Oreal true match series – they are my all-time favorites. A great alternative to the MAC one!
  • Next, BLUSHES. I love blushes! I think using a neutral/ light pink blush gives you a natural look. It just adds so much sheen and color to your face. You can use a matte blush if you want a morning look and shift to mineralized blushes which come with a glow for a night look! 
  • Again here I love MAC Petal Power blush! You can use a little for a light glow and build on to it for more glow for a night look! Honestly I haven’t tried many matte blushes, because I feel a blush should make your cheeks glow rather than just sitting there matte if you know what I mean 😏 Of course, everyone may not like it, so for matte finish I recommend the Revlon Matte blushes. If you want to go glowy (like me) then a cheaper alternative is the NYX baked blushes, I just loveee this product! It just makes your cheeks pop and make you look super cute, definitely recommend it! 👍  

  
From left to right: Milani baked blush, MAC studio fix foundation powder, MAC petal power blush

Those are the two basic things for the face. If you have lot of under eye circles, sorry I have to say that you need some sort of a neutralizer and a concealer (like me :/) But  I don’t use it for a natural look, they are a part of my face and I won’t let it bother me too much for an everyday look!

Eyes

  • Eye Shadow : When it comes to eye make-up you need to shape your eyes and give them some depth so that they look nice and gorgeous. I recommend using a neutral palette for an everyday look. I love to always add a tinge of pink when it comes to my eyes! I don’t go for dark colors because I have dark circles and without properly concealing them, a dark eye shadow will make the eyes look even darker. That is something to remember for those who have dark circles around your eyes.
  • I recommend using the Revlon/ L’oreal/ Lakme netural eye shadows. I also have a MAC palette which has one light color, one dark color and one light pink color. 
  • So to sort of take you through it, use the dark color just on your crease to give some depth and shape to the eyes, the pink one on your lids and the light color under your eyebrows. That is the basic pattern, just apply these colors and blend them together for an everyday breezy natural eye shadow look! (Shilpa here hi guys! I really had to poke my nose here at this point and add, I realised adding white eyeshadow below your brow bone and ever so lightly to the inside corner of your eyes really make them look wider! My limited gyan I have now passed on to the world!) 

 From left to right: MAC eye shadow palette, Lakme 9 to 5 series eye shadow palette

  • Eye-liner and Kohl : I sometimes use just eye liner since I have dark circles; I try to avoid the kohl since it may smudge. *Tip* : to avoid smudging, top your kohl/ kajal with some black eye shadow, it will not smudge since the powder will prevent smudging!
  •  I love the Maybelline master precision eyeliner! In the Lakme series, I love the plain old liquid kajal, it is one of the best things I have used! For Kohl I recommend the Maybelline kajal and MAC Kohl 
  • The best part of eye make-up is…wait for it…MASCARA! Believe me, whatever eye make-up you do, it will not be complete if you don’t finish it with mascara. If you want to go that extra step, applying mascara after curling your lashes will make a bigger difference than just applying mascara.
  • I recommend L’Oreal’s mascara or Maybelline mascaras. Benefit’s mascara is really good too! I haven’t tried any high end brands, but I have used Dior once and that one is great too!

  From top to bottom: Benefit they are real mascara, Lake eye liner, Maybelline master precise eye liner, MAC black Kohl

Lips

  • Once again for an au natural everyday look, I prefer a nude+pink color. In the picture below to create this color, I mixed a peach and dark pink color. I have always had a hard time finding a right color for indian skin tone in the US, I found this mix of colors to give the right blend I wanted, these lip colors are from Lakme! I also like the colors from Revlon and MAC. The NYX shiny lipsticks they are a personal favorite too!
  • If you have some discoloration on your lips, use a lip liner before you put on your lip stick. A beige/ nude color would do the job perfectly; I use the NYX/ Revlon lip liners. This will form a great base to your lipstick and make it look seamless.
  • Another great lip tip – just like how you moisturize your face before make up, don’t forget to moisturize your lips as well, put on a lip balm when you start your make up so that your lips are ready for make up by the time you get there 👍

  
From left to right: Revlon lipstick, Lakme lipstick, NYX Lip liner


From bottom to top: NYX lip liner, Lakme lipstick, Revlon lipstick, All blended – notice this color is between a nudish peach and pink – I thought this perfectly suited my skin tone and the lip liner has given a strong base to the two lipsticks which make the lipstick look flawless.

Oh and one last thing, I didn’t mention about brushes I used, mostly for this look I used the small brushes that came with the palette and also my hands of course. If you are interested, I suggest owning a couple of brushes for the face and one for the eyes (mostly for blending the eye shadows)!

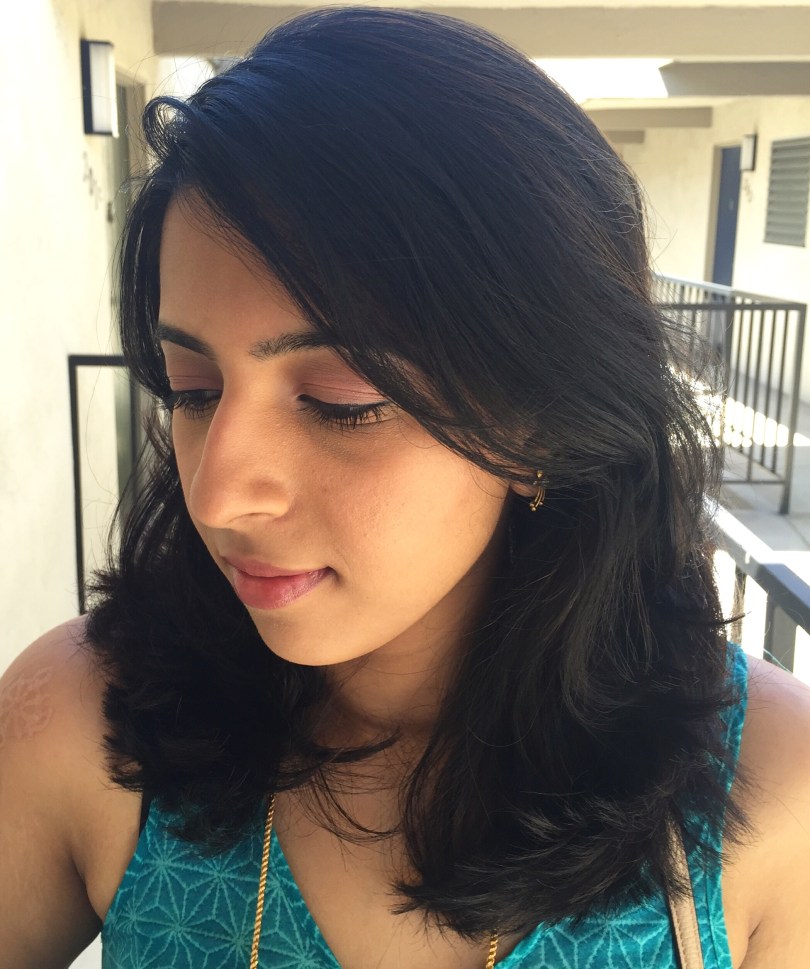
Finally in the pictures below.. The natural everyday no make-up/ make-up kinda flawless look I created for a casual Saturday shopping with all the above mentioned products, but I used a concealer since this post is too special and I definitely wanted to make the make-up special, haha, anyway all the other products are just the ones I have listed above  (P.S. you can see that the blush on my cheeks becomes a bit glowy when the light hits my cheeks – the last pic was taken in the night in front of lights, please ignore my bag behind 😋) 


Overall, I hope this post was useful for you people out there and I hope it inspires you to try on make-up and feel dressed up and festive about yourself during special occasions or even daily to office!! I am not suggesting going overboard, but believe me a little of it will make you feel good 😃 

Oh and I hope you guys had fun reading! Take care you all!😊

A note from Shilpa : Deepika has explored makeup from scratch in a span of couple of years and I thought she ll be able to teach all girls (like me) who want to start their makeup journey but just don’t know where to start it! Recently I saw this picture on Deepika’s wall on Facebook and that’s when this guest post idea struck me and we got talking and the rest I would like to grandly claim is history!   

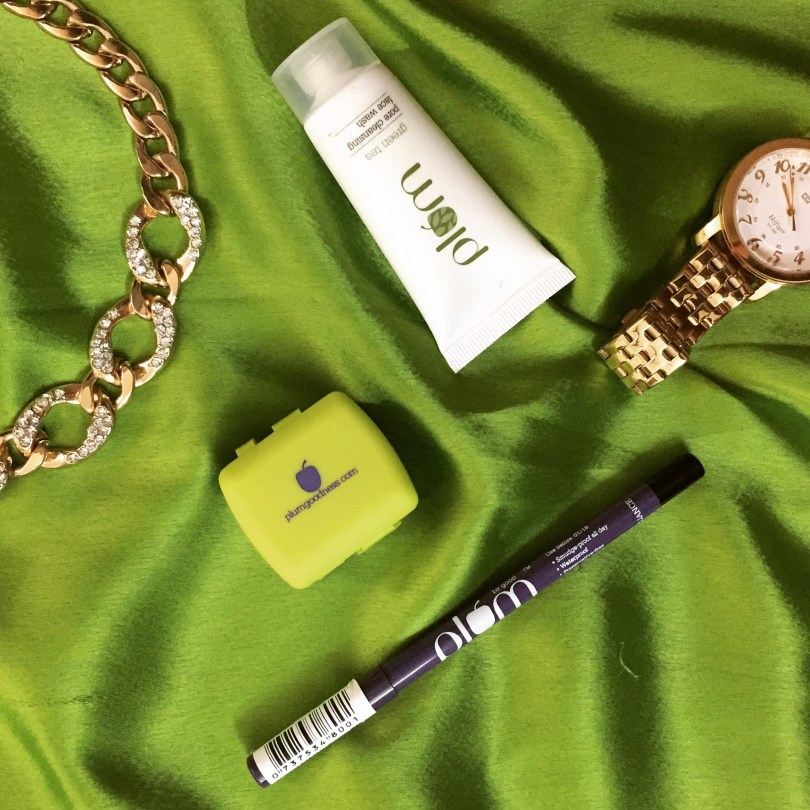
Plum Cosmetics Giveaway! 


A couple of weeks back I had reviewed the Plum NaturStudio All-day-wear Kohl Stick (read review here) And Plum found the response so overwhelming that they decided to host a giveaway on my blog! This giveaway runs for seven days (winners get announced with the post next Monday) Giveaway is open through my Instagram profile, blog and Facebook profile. 

All you got to do is follow my blog/Facebook page Click here/Instagram profile (@frillthrills_fashionblog/Instagram) and subscribe to the Plum mailing list here. Once you’ve done that comment in this blog post saying done and add one home remedy beauty hack you follow for your eyes and skin. One lucky winner gets a NaturStudio All day Wear Kohl and the second and third winners get the Choco-Latte creamy body wash and Choco-Latte luxuriant body lotion respectively! 

Giveaway open to Indian Residents only! Do enter and stand a chance to win these amazing products 😊 have a nice week ahead !!


Customised Sneakers – A DIY

Do you have a Pinterest board full of these beautiful hand painted sneakers which is all over the internet now? Then you’ve come to the right place! 

Do you love doing DIYs as much as I do? Then you’ve come to the right place! 

Are you randomly going through my blog because it popped up on your RSS feed? Then you’ve come to the right place (just kidding…but stay anyway please ❤️🙏🏻) 

So last week I had a day off and I decided to do something fun! 😍 And that’s how this customised sneakers idea was born 😊let’s jump right into the DIY! 

Things you’ll need 


Step 1 : Draw half circles using the coin throughout the shoe. You might want to imitate the design on one shoe more or less equally and similarly on the other shoe. Also decide right at this stage which are area which will have the design and which parts of the shoe are going to remain blank! 


I decided to have the design throughout the sides of my shoe and the flap inside and leave the top portion plain

Step 2 : Since my theme was watermelons I painted the half circles red. Since a lot of layers and coats are going to come above this red don’t worry if the paints or the borders are not too precise. 


Step 3 : Paint the background with any neutral or contrasting shade. I went for black. I decided not to paint the flaps inside to give it some black and white effect. Unfortunately I forgot to click pictures at this stage. 😟 

Step 4 : Add the detailing required to complete the watermelon. Draw a first outline with a dark sap green and the next outline with a sort of light minty green. Add the seeds inside. I went for white seeds because that stood out better than the black seeds! 

  
Step 5 : Allow the shoe to dry for sometime and touch up all the areas which require some perfecting and touching up. A second coat does make a significant difference! 


Note the difference between the previous image and this one! Magic of an extra coat!

Step 6: Lace it up and flaunt it like it’s nobody’s business! HAHA! 


Hope you’ll enjoyed this DIY! Please try it soon and tell me what you painted and how it went! 😍  

Plum NaturStudio All-day-wear Kohl Kajal – A Review

You know how they say “things just fell into place”? That’s what happened to me with this post! I was not going to post this week because I had nothing going on and I really wanted more articles in my skin and beauty theme! But miraculously, late last week Plum Cosmetics sent me their newly launched Plum NaturStudio Kajal cum liner for a review and the review is Readyyyy!!

So Plum Cosmetics is a brand I have been loving for a while now. I have tried their Green Tea face mask which works very well for me. As a brand they stand for a couple of things : it is india’s first online cosmetic brand which is always free of parabens, phthalates, SLS and other harmful chemicals.

This Kajal-cum-eyeliner came to me last Thursday and they sent it with a Dual sized pencil sharpener and a complimentary face wash too (yayyy)


I have been using this pencil through the weekend and on Monday I wore to office conducting a small experiment of sorts where I took pictures of my eyes in regular intervals to show you guys how the liner and the kohl hold up!

The pencil itself looks something like this:

It is a pencil but gives a highly pigmented and dark gel-like finish which I love! The brown area which is usually wood in normal pencils is PVC-free plastic and that makes it a little tough to sharpen.

The plum website has the following words about this Kohl liner

For the first time in India, an ophthalmologically approved kajal pencil with a gel-liner like performance. 100% smudge-proof, water-proof single-swipe brilliant black kohl-cum-liner that’s also gentle on your eyes.

Ingredients used:

Hydrogenated Castor Oil : Highly hydrating and nourishing for skin and hair with healing properties. The hydrogenation makes it stable and compatible with the other ingredients.

Rice Bran Wax : A relatively unknown but amazingly effective moisturizer that lends creaminess and hydrating properties to any formula!

Natural Vitamin E : Needs no introduction as an antioxidant skin care specialist that’s essential for hydrated, younger looking skin.

Do note that owing to its high performance benchmark, this product is not all natural – but is 100% safe and tested by dermatologists and ophthalmologists.
Moving on to my experiment and then to the pros and cons:

On application 


It took me roughly three minutes to complete the eyes – kohl plus liner. The same stick is to be used for both purposes. Now I am a liquid liner junkie and I find gel based liners very tough and impossible sometimes to apply but this pencil does the trick very well giving a dark and beautiful finish to it. It is your perfect friend for a smokey eyed look!

Four Hours later 

Until four hours I swear there was no difference in the way the kajal and the liner held up and I found no use in uploading those pictures (which is a good thing by the way haha!) and hence moving straight onto the fourth hour 

By the end of the fourth hour this was the look. The eyeliner and the kajal look just the same except that the kajal had slightly come out of the waterline. I have a pretty watery waterline and I am guessing that happens with time with any good liner.

Seven hours later


 Now here was the where I found fading. The eyeliner on my left eye and the kajal on both eyes were gradual fading by the seventh hour. But the liner on the whole was still holding up well, just that the bright dark black had become lesser intense.

Nine Hours later 


At the end of nine hours the kajal had faded a little more and spilling more out of my waterline and into my lashes and right outside my eye and the eyeliner a little more faded. I would be lying if I said it was just like when I applied it cause that’s not true. The fading is pretty obvious but I have never ever used an eyeliner or kajal for so long anyway!

Now moving onto the pros and cons in bullet points

Pros 

  1. The thick beautiful dark output. I have never got such a beautiful result in any eyeliner and I loved that!
  2. Being very sensitive eyed I was so worried that this kajal might not suit me (trust me the most expensive kajals I have bought are still sitting in my drawer brand new because they didn’t suit my eye:( ) but this one is so gentle on the skin! I loved it.
  3. It’s very long lasting and going by a whole day without touching up my kajal is pretty unheard of for me and it was a reality with this one yayy!
  4. A lot of Kajal stocks claim to be two in one but I have been able to use none of them as eyeliners. But this one is truly 2-in-1 and works wonders on top and below the eye!

Cons

  1. Rate : At Rs.425 it’s not particularly the cheapest Kohl stick in town. I guess we pay the premium for the quality and the fact that it’s two in one and because it suits all skin and eye types!
  2. The sharpening part is pretty heart wrenching. I needed to sharpen it every time to get a smooth thin eyeliner line and when I sharpen it I see so much of the product getting smudged and wasted on the sharpener and I was pretty disgruntled about that!

So I would give this NaturStudio All Day Wear Kohl Liner a sure 4.5 on 5 with a 0.5 negative only for the second point on wastage because it truly scarred me guys! (😂) Here’s a link to the Plum website where you can order this Kohl Liner for yourself. For a limited period they are giving off the sharpener free for every order of the liner so hurry! 😍

http://plumgoodness.com/products/naturstudio-all-day-wear-kohl-kajal
Have a beautiful rest of the week my beautiful readers! ❤️

My Nightly Skin Care Routine!

Ever since the last post came up about skin care people have been asking me to share my skin routine! And I thought the only routine I religiously follow is the nightly one and so it would be only fair to talk about my nightly routine in detail with you guys 😊 

The thing about skin routines is that whatever you read up about it on the internet it is in the end a rigorous trial and error before finding the products that work and don’t for your skin. I for one tried three brands before finding something that worked for me! So let’s get started! 

  
For the past six to eight months I have shown unwavering loyalty to one brand for my night time routine – Kama Ayurveda! Now I know this is not so friendly on the pocket but this was pretty much the only brand that worked for me so I have learnt to love it despite its price! 

My routine is the usual CTM -cleansing – toning – moisturizing because that helps my combination skin breathe easy all night! 

Step 1 : Remove Make up 


The first step would be to remove the make up that has been working on your skin through the day. I use the MAC Gently off Eye and Lip Makeup Remover because it works like magic to get off the almost goth like edgy eyeliner and kajal I have on through the day! 

Step 2 : Cleanse 


To wash my face I use the Kama Ayurveda Rose and Jasminr Face Cleanser. Of all the Kama products this has to be my absolute favorite one! I have never used a face cleanser which doesn’t lather much but still removes the oil and grime just fine like this one! The lazy me loves the fact that literally two splashes of water does the trick 😝

Step 3 : Tone 


 For toning I use this light and lovely Kama Ayurveda Pure Rosewater. I spray it on my face and let it on for a minute to sort of sink in. A chemical toner should at this point be wiped onto the skin with a cotton pad and not be allowed to stay on the skin I suppose but this being natural rose water I quite like it to remain in my skin so that’s where it stays. 

Step 4 : Moisturize 


Once the toner rose water has sort of sunk in I Moisturize my skin. I alternate between two products in this step. One day I use the Body Shop Tea Tree Blemish Fade Night Lotion and the on the next day I use the Kama Ayurveda Kumkumadi Miraculous Beauty Fluid. 

The Blemish Fade Night Lotion does exactly what it claims. It calms down the acne and irritated skin and even closes open acne scars. I love the pump packaging it comes in. The trick in moisturizing is more to do with the massaging rather than the actual product itself. Take a small quantity of the moisturizer that works for you and ensure you work it into your skin in wide circular motions on your cheek forehead and in up down motions on and below the sides of the nose and your neck. 

The KumkumadiMiraculous fluid is a potent oil which works it’s magic just like that! Just two drops of this liquid does the trick for the entire face. It doesn’t matter that you have oily skin. This fluid works on your skin through the night and gives it a beautiful glow the next morning once you wash it off. The packaging and smell are a slight put off but the results make up for these shortcomings. 

Step 5 : Moistize the Lips 


The last step is moisturizing my lips. Now this step I have added to the usually prescribed routine because I’m a person who eats up the lip balms I use through the day 😐 I also have a tendency to chew my lip while concentrating at work which really makes my lips a wreck! So I apply a lip cream or balm through the night so that my lips are back to a chewable condition the next day 😋 

Step 6 : Sleep Tight! 

Ya that doesn’t need a picture does it! Haha 😉 

So guys that’s my nightly routine. It’s always good to have such a night routine because that’s the time your skin gets some solid time to rest and the least we could do is make it feel better with this simple CTM routine! 😃 all the best finding the products that work for you! Honestly it’s a long drawn process and finding your skin’s calling could take months! So do it slowly if you must but start off soon all the same because trust me it does make a difference! 

Have an amazing week ahead readers! Hope you enjoyed this post! ❤️

  
A selfie just because! Haaaa! 😘